Navigation Bar |
| HOME |
| Online Catalog |
| Beader's Info |
| Mailing List |
| Calendar |
| Close Outs! |
| FAQ Page |
|
Click these links |
| Beader's Info Page | Bead Wire | Birthstones |
| Construction | Crimping | Earrings |
| Jewelry Lengths | Memory Wire | Rules To Live By |
| Seed Beads Per Gram | Supply List | Tools |
|
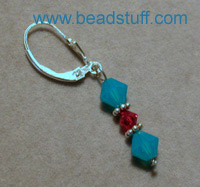
Easy Loop Earrings |
|||||||||
| Great earrings
are never more than a few minutes away. Gather your tools and materials and
let's get busy!
This is a good basic technique for every jewelry maker to know. Earrings can be created in a few minutes using an infinite variety of designs. You can make them simple or ornate, large or small. They can sparkle or be earthy. Since you are the designer, it's your world. Feel free to do some experimenting! |
|||||||||
|
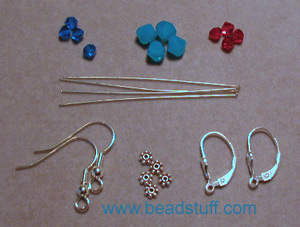
MATERIALS
|
 |
||||||||
|
TOOLS
|
If you want to view the supplies for making
this project, I've included links to the pages that contain the materials.
Each link opens a new window.
|
||||||||
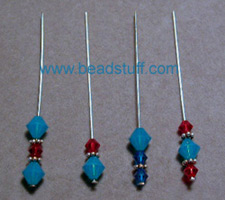
| Arrange your beads and spacers on the headpins to create a pleasing design.
It's your design, so use a combination what works for you. You need
enough wire to form a loop so don't fill the head pin too full.
Keep your designs simple in the beginning, then experiment as you gain experience and confidence. |
|
||||||||
|
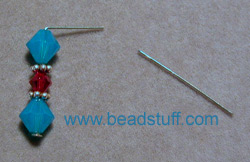
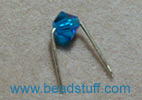
Use your finger or the chain nose pliers to bend the head pin over at a 90 degree angle. It's ok if there is a little space between the beads.
Repeat for both earrings trying to make them both the same size. |
|
||||||||
| The head pin will need to be cut to the correct length. The remaining head pin needs be approximately 3/8 inch from the bend to the cut end. Use the wire cutter to cut off the excess wire. You should cut both wires the same length. By varying the amount you cut off, you can make larger or smaller loops. You can save the cut ends for other uses. |
|
||||||||
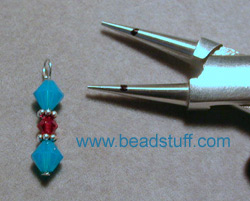
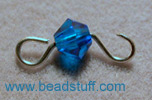
| Use the round nose pliers to grip the end of the wire close to the cut end. Curl the head pin to form a loop on both of your earring dangles. Curl them around until you form a complete loop and try to get them both the same diameter. Practice will make this easier for you. |
|
||||||||
| Tip: Use a Sharpie pen to mark the jaw of your round nose pliers so you know where to grip it each time. Always grip the wire at the mark. The line shown is about a 1/4 inch from the tip of the jaw. | |||||||||
| Use
the chain nose pliers to open the loops you just made. Open the
loop to the side so you don't get the loop out of round. Open each one
just enough to slip them onto your ear hooks.
Now close the loops again using the chain nose pliers. Check to be sure each dangle can't fall off the hook. |
|
||||||||
|
Both earrings should be approximately the same length. Use the chain nose pliers to adjust or straighten each of them as needed. Place them in your ears and you can be proud to proclaim to the world "I designed and made them myself!" Enjoy! |
|
||||||||

LOOP LINKS
Experiment using this loop technique to make a loop on both ends of a piece of wire. Put a bead in the middle and you have made a "bead link". You can hook the links together to form a chain of beads or use the links to connect short pieces of chain and you can form beautiful bead and chain jewelry.
Trim each end, then bend the ends at 90 degrees as shown before. |
Form a small loop on each end. The loop on the right is shown 3/4 closed. |
Close each loop and straighten as needed to make a finished link. |
|
|
This is a great use for that "end" you cut off the head pin when you made the earrings above. Use these scraps of wire to make links using this technique. They can be used to create "links" for use in other jewelry as well. This same technique can be used to make the links uses to create a beaded rosary. |
 |
||
|
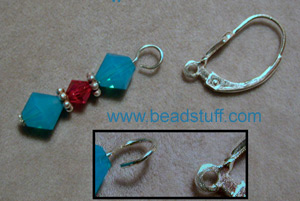
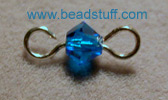
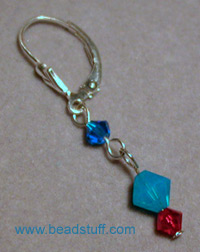
You can use these links to create interesting combinations. I like to make articulated earrings like the earring pictured above. I use the loop link to connect the dangle link to the earring so they have more movement in the middle. |
|||
|
Feel free to print these instructions and share them with your friends. We require that you include our name and copyright information. Contact us prior to using this for classes or commercially, you need our permission. |
Copyright 2006 |
||
If you use these instructions, send me a picture of your project, I love to see what you create. You can send your photo to me at: doug@beadstuff.com.
Tall Pam says "It's Easy and Safe to order online. Orders are processed on a Secure Server!
To place your order, browse our product pages. Enter the quantity you want to order, and click the ADD button to add the items to your order. After completing your selections, proceed to the Checkout. Type special instructions in the comments area available during checkout. We appreciate your business! For additional information, you can contact us with email to tallpam@beadstuff.com We accept VISA, MC, AMEX, Discover, Check, or Money Order as payment.
We carry a great selection of beads including: Swarovski crystals, glass beads from the Czech Republic, Japanese Miyuki seed beads, turquoise and coral, gemstone beads, gold fill, copper, sterling silver and plated findings, Beadalon and Soft Flex bead wire, and a selection of jewelry tools and beading supplies. Visit the Contact Us link for more information.
Copyright 1997-2017 BeadStuff - All Rights Reserved